Friday, July 1, 2011

Painted Decorations

So, I decided over the next two weeks to share some decorating tips with you. The tip I wanted to share with you today is that it's okay to go simple and old school with your decorations too.

One great way to save money on your decorations is to make some of them your self...or have your counsellors make them.

Today, I thought I'd share some painted decorations that we are using this year.

Just grab some bristle board and some tempera paint and create child friendly, colourful designs for your walls.

As I've mentioned in other posts, our theme this year is Beach Bash so I tried to create some beach summer friendly designs.


I know they are super simple but they are kid friendly and add a pop of colour to our white walls. Plus creating some of our designs will help us save money ... which can be used else where.

So grab a paint brush my fellow day camp directors and let inspiration hit you. Get in touch with your inner child and make simple painted designs to add to your walls.

Sincerely,

Your fellow terrible artist and ditzy day camp director

Buying in Bulk for the Tuck Shop

One of the things that has been a regular fixture of our camp for the past few years has been the tuck shop. Every week the kids can bring up to $2 to spend at the tuck shop on Friday. They love having an opportunity to decide what they want and spend their own money.

Plus its great for us because it's one less snack we have to plan.

Any who, last weekend my Assistant Director (David) and I needed to go buy the things for tuck shop.

So we headed over to the local Costco, filled up two shopping carts with sugar, and spend over $350 dollars on candy.


Now that might seem like a lot of money to spend on something like tuck but it isn't really....When you think about that, that is spread over 6 weeks of camp. So really we only spent about $58 dollars a week. Which isn't a lot when you think about it.

I think sometimes people are afraid to buy a lot of stuff in bulk but the truth is that it saves you money. And since being thrifty is a great trait for a day camp director to have....buying in bulk is a great tool for you. It's hard though...shelling out $350 all at one time but if you can afford it, it's the better way to buy things.

Plus, depending on how much you sell the items in your tuck shop for you might end up making a profit. Now I'm not suggesting you hike up the prices and charge kids 200% for things but for example...if you buy pop in bulk it might only cost you 70 cents per can. If you sold it in your shop for 75 cents you can find some extra money for camp that you can spend else where. And finding money is always fun!

So good luck saving money, buying in bulk, and getting weird looks at people who see you fill up two shopping carts all on candy....

The Ditzy Day Camp Director

Wednesday, June 29, 2011

One Stop Decoration Shop: Oriental Trading

So if there's one thing you need to be as a Day Camp Director...that's thrify. Quickly, you'll learn how there is never enough money for what you need to do, especially if you are a camp where you have a low camper registration fee or if you give out scholarships or bursaries to low income families (like we do).

So, since I know how important it is to be thrifty, I thought I'd share some of my tricks for saving money when it comes to decorating. You want your decorations to be epic but you want your budget on them to stay low....


Well I found this great website a while ago orientaltrading.com and they are the perfect one stop decoration shop for you! Their prices are great and they seem to have everything you could think of. Not only are they good for decorations but they are great for craft supplies and any other camp thing you need. This isn't an advertisement...it's me just honestly excited to share this gem with you.

I have ordered with them tons of times and I've loved my experience with them every time. On their website you can see customer review and ratings for each item, so you know exactly what you are getting and they have a great return policy if something you buy doesn't work or if you don't end up using it - and that's another way to save money (return it if you don't use it).

But back to decorations....

On their website they have a party themes and events section where you can find all your party essentials from party supplies and favours, tableware, decorations and even candy.

If you are looking for decorations they have everything from hanging decorations, wall decorations, and even banners. And a lot of their banners can come in pre designed ones or you can customize them!

When you are shopping for your decorations you can shop by category (party supplies and favours, party tableware or personalized products), shop by occasion and event (birthday party, baby shower, wedding, or popular occasions), or you can shop by theme.


They have tons of different themes too. Like: pirates, sports, western, animal, fiesta, luau, princess, bugs and butterflies, dinosaurs, monkeys, movie awards, safari, and MUCH MORE!

Not to mention, that they usually have some of the popular VBS or Sunday School themes if you are from a christian day camp or VBS. Like this year they have the Panda theme and the New York theme.
So head over to their site and enjoy their help and wonderful products.

Yours.
A very happy and productive feeling ditzy day camp director.


Theme Signs

So this week I've been crazy busy planning for camp, and staff training, and decorations and everything else there is to do but I wanted to continue posting some helpful day camp hints. So this week I thought I'd help with some decorating.

A cheep but great way to add to your overall decor, is room signs. You can either create them by hand (if your creative) or you can make them on your computer. I made mine on the computer...just because it was easier and quicker.

It's a great way to help people know what rooms are for what, add to your decorations, and let kids know which rooms they shouldn't go in. Also, it can be super fun to have cool names that are theme related to your theme for each room. Way cooler then craft room or chapel.

So here are our Beach Bash themed signs...enjoy.

Forever,
The Ditzy Day Camp Director

For our library, where the kids can just sit back, relax and read a book.

For the center of all activity, the gym, we called it the Marina.

Every Friday we hold a movie, so we decided to call it the drive in. I found this cute picture on google.


The Cook Out is our kitchen...the hub of snack making and baking time.

Instead of having a craft and activity room, we called it the sand castle.

Our staff room is known as the life guard station, because no swimmers (kids) can come in.

Our chapel is known as the Beach.

The lunch room...the Wave Cafe.

And the restricted rooms are known as 'No Life Guard on Duty' areas.
I'd love to see what signs and room names you come up with!

Monday, June 27, 2011

T-Shirt Tie Dye


So I've been posting about t-shirts for the past few days and I thought I'd give you one more fun idea to make unique camper shirts - tie dye.

Yep, I said it...tie dye. As funny as it sounds, tie dye looks awesome for camper shirts and it's super fun and easy.

Why not just get plain white shirts with black printing for all your campers...trust me it will save you a ton of money! Then let the kids have a tie dye party!


I saw one camp last summer who had done this and it was an awesome idea! Firstly their kids looked incredibly adorable and they stood out like crazy! No need to fight against other camps who all have the same colour shirts as you...now you can be unique and have fun doing it.


The kids have a blast making their own shirt and they each get to be different!

Plus this works for any age!


So have fun my hippie day camp directors. Make camp shirts or just do some tie dye arts and crafts this summer.

Yours,

The hippie ditzy day camp director ME


T-Shirts with Custom Ink

So in my last post about t-shirts I mentioned this awesome site that we created our t-shirts with...customink.com. I really adore this site, so I had to share it with you! It's so super easy to use and will definetly make your t-shirt buying experience soooo much easier. Plus the people at custom ink are amazing, super helpful and friendly. It seems like they really love their jobs and that definitely makes the t-shirt buying and designing process so much easier!

So I figured in this post I could walk you through the process of designing and buying your t-shirts with customink.com. Now...just so you know this isn't an advertisement .... this is simply a company I really like and wanted to share.

So the first thing you need to do is make sure you are on the right part of the website. If you are from the USA you can go to the regular site customink.com. If you are from Canada go to the Canadian section at http://www.customink.com/canada/. All other countries can go through customink.com.

So follow these steps to make beautiful, professional looking gear. You select the product and design it. Then the custom ink crew comes into the picture touches up anything, processes your order and sends it to you just the way you want it!
Click the orange 'get started' button and you will be taken to the product catalog. Here you can choose from a variety of products from t-shirts, to sweats, to hats, to other giveaway items. Click the product that you'd like to customize...for this sample I've chosen t-shirts.
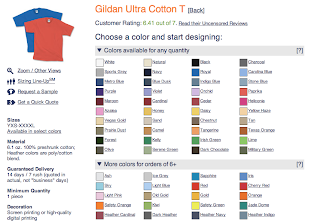
Once you click on the product you'd like you will be directed to pick the type you'd like. In the t-shirt category you pick what kind of shirt you'd like. For camper shirts I'd go with Gildan because it's the cheapest but pick whichever kind you'd like. Once you click on the orange 'pick a colour' button you will be take to a place where you choose your colour.

Here, you will see all the colour options you can get in that t-shirt style. Notice that some of the colours are only available in orders of 6 or more shirts. Since you are creating a camp shirt this shouldn't be a problem. So go ahead pick your favourite colour - don't worry you can change this later if you change your mind.

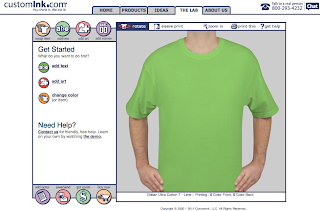
After picking the colour you will be directed to the customink.com customizer section. Note: I'm not sure if it's actually called the customizer but I really like that word so I dub it that. Anywho, in the customizer you can add text, change the colour of the shirt, add images, add names, design the back, save, and get a quote. Honestly, it's super easy to use so don't get overwhelmed.

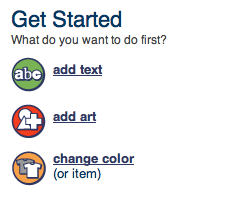
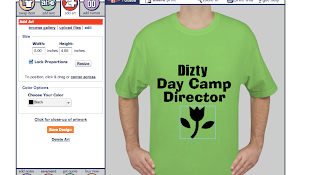
In the customizer (which I just realized is called the lab - but I still want to call it the customizer) you can do so many things. On the left hand side you will see the 'get started' section. I decided to start by adding some text.
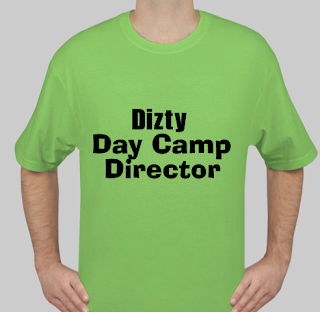
Just enter the text you want on the shirt into the box and click 'update'. Now you can change the font, change the size, the text colour, shape and much more.

So once you find the font, colour, shape etc. that you'd like you can click the text and drag it to the perfect spot on the shirt. Yep, it's that's easy.

You can even rotate the text so it doesn't lie straight. This is a great effect to add some extra emphasis.


Now that you're done adding text you might want to add some images or pictures. Custom Ink has tons of pictures and images you can use. Search their huge inventory till you find something you like. Click the image you'd like and it will add it to your shirt. Then you can change the colour and size of it. Drag the image to where you want it on the shirt. Yep, it's that easy!


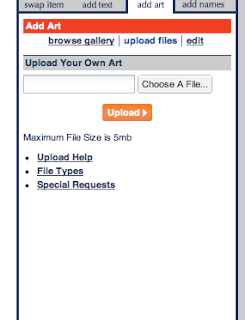
Now if you don't find any images on Custom Ink that you'd like or you have another image or camp logo that you'd like to add to your shirt you can always upload your own image. I love this function because then you can really make it your own. We did this with our shirts and they turned out great!

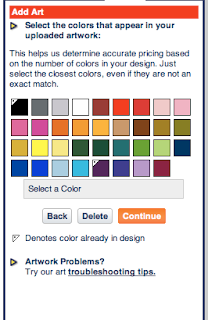
After uploading your image you're going to have to do colour selection. Try to pick the colours that are in your image. Don't worry if they aren't perfect...the custom ink crew will help you with that later. The reason you have to pick your colours is so that you can get a more accurate price quote later.

Upload as many pictures as you like, resize them, and drag them where you want them. Yep, it's that easy!

Then when you are done, in the bottom left click quote. Put in the number of shirts you'd like and what size and the customizer will generate a quote for you. Note: that it will provide the quote in a per shirt price and overall price. Also the more shirts you order the lower the price will be. Also note: this is just a quote...it might go up or down after the custom inkers look at it.


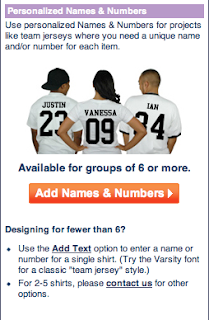
Custom Ink also has other cool functions. Like personalized names and numbers. What a cool idea for a baseball team or counsellor names or whatever else your heart desires.


You can also ask them to do half your design in a different colour t-shirt. we did this for our camp so that we could have the camper shirts in one colour and the counsellor shirts in another colour.

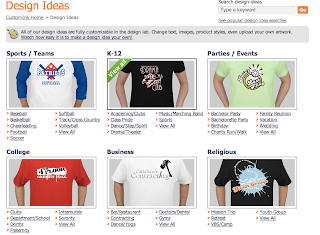
One of the other cool functions they have is design ideas. Yep! They have design ideas for a variety of different t-shirt reasons. Not so creative? Their design ideas are perfect for creating professional looking but super easy to make shirts. At the top of the screen just pick ideas and you will be taken to a design idea section where you can browse over a 100 something ideas (just made up that number...but there are a lot of ideas). Find the shirt you like...click on it...change the colour...change the camp name...change whatever your hear desires...or keep it the same...and you've got an awesome looking shirt in no time!

With such an easy website and customizer and design ideas, how can you go wrong? YOU CAN'T! So many of my friends and colleges have used this site and thought it was wonderful....try it out...it's free to fiddle around on...and when you find the shirt you love it's as easy as can be.

So my day camp directors...enjoy fiddling and let me know if you have any questions. I'll post pictures of our shirts as soon as they come. Ours are suppose to get here on Friday. Yay!

Toodle Do,

Ditzy Day Camp Director

Promotion: Phone Calls

So this is going to be a short post but I just wanted to give you another idea for promotion: phone calls. Yep, I'm going old school and pulling out the phones.

As lame as it sounds giving each camper family from last year a call to let them know you're hoping they are going to come to camp and answering any questions they might have is a great way to show you care, remind them that you're there and promote for camp.

It's super easy for parents to get busy and forget to register their kids for camp so a friendly call can be just the thing they need to get that thing crossed off their to do list. So call them up and chat up camp. Just remember to be friendly, and you never know...this might help you register some more kids for camp.

Happy calling...

Yours truly the Ditzy Day Camp Director